
I was bored one wet, cold, miserable winter's day, do I decided to have a go at making my own drawing charcoal.
We are lucky enough to have a wide range of trees on our property, including a variety of fruit trees, so I was spoilt for choice of what wood to use.
Willow is often recommended as suitable for making drawing charcoal, but we don't have any willow.
Grape vine is a popular choice and I have also heard of apple being used successfully. We have both of those available.
I snipped a couple bits of semi-hard wood from an apple tree and grape vine then prepared it for roasting into charcoal.
I videoed the whole process, so you can follow along on Youtube.
For those who like a bit of science, I included a brief, simple, infographic explanation of pyrolysis; the process that sees wood turn into charcoal instead of ash.
I did a quick test with the charcoal and thought it performed pretty well, although some bits were a little scratchy. I hope to do a few more experiments using different woods and longer roasting times and see if I can get better results.
Monday, August 14, 2017

Friday, July 28, 2017
How to make wet panel carrier widgets
When I travelled to the John Wilson workshop in Katoomba last February, I had to devise a plan for bringing wet paintings home in my luggage.
I made two wet-panel-carrier boxes from plywood, using balsa wood for the divider strips, but I also needed something for paintings that were too small for the boxes.
After fluffing around with various ideas using timber strips and elastic bands – ideas that failed, I might add – I came up with the idea of making small corner spacers that could be held on with clips.
These would work for paintings in a variety of sizes as long as I had a pair of same-size boards to clip together.
I videoed the making of them and have finally edited the footage and uploaded it to Youtube.
While the process looks a little cumbersome in the video, that's largely because I was trying to orient everything for the camera as I worked on just one widget (and also because some of the balsa proved very difficult to cut, even with a sharp knife!)
In reality, it took less than a couple of hours to make 32 of these little spacer widgets – enough to carry 16 small wet paintings. It took me far longer to make the two box carriers.
I would only use these on small paintings, up to around 10"x12".
I haven't tried yet, but it might be worthwhile to make some straight widgets to clip to the centre point of each edge, and this might make them more practical for slightly larger paintings when combined with the corner widgets.
I made two wet-panel-carrier boxes from plywood, using balsa wood for the divider strips, but I also needed something for paintings that were too small for the boxes.
After fluffing around with various ideas using timber strips and elastic bands – ideas that failed, I might add – I came up with the idea of making small corner spacers that could be held on with clips.
These would work for paintings in a variety of sizes as long as I had a pair of same-size boards to clip together.
I videoed the making of them and have finally edited the footage and uploaded it to Youtube.
While the process looks a little cumbersome in the video, that's largely because I was trying to orient everything for the camera as I worked on just one widget (and also because some of the balsa proved very difficult to cut, even with a sharp knife!)
In reality, it took less than a couple of hours to make 32 of these little spacer widgets – enough to carry 16 small wet paintings. It took me far longer to make the two box carriers.
I would only use these on small paintings, up to around 10"x12".
I haven't tried yet, but it might be worthwhile to make some straight widgets to clip to the centre point of each edge, and this might make them more practical for slightly larger paintings when combined with the corner widgets.
Saturday, May 20, 2017
Distractions in wood

I seem to have discovered yet another distraction so I apologise in advance to those who might read this expecting to find information about oil painting. Though I will state up front that linseed oil does make an appearance in this article.
While searching for information, back in January, on ways to transport wet oil paintings on a passenger jet, I repeatedly came across general information on old-school woodworking techniques.
The last time I made any real attempt at traditional woodworking was over 40 years ago in high school and, frankly, I was pretty hopeless at it. Chisels and I were not the best of friends. We just didn't understand each other. When it came to hand saws, I was ambidextrous - I was equally bad with either hand.
I don't recall ever advancing to using a wood plane or creating a successful timber joint of any description.
But at the start of this year, while looking to solve a painting-related problem, I found myself mesmerised by craftsmen who demonstrated the use of "old-fashioned" hand tools. Unlike other "DIY" woodworking videos I'd seen before, there was no expensive bench saw, drop saw, drill press, planer or jointer in sight. And, rather than a workshop full of airborne dust and extraction ducting, the people I watched were surrounded by curly wood shavings lying around on wooden bench tops.
When I discovered Paul Sellers' blog and Youtube channel, I was soon hooked. A craftsman of some repute, Paul demonstrates traditional methods simply, calmly and in soothing tones. Every video I watched left me thinking "I can do that".
While I was away on a painting workshop in February, my wife found an old Bailey-style No. 4 wood plane, a chisel and a Stanley "eggbeater" drill at a car-boot sale in Perth. The plane was a nameless brand that looked like a traditional Stanley model but bore no confirming markings and, to be completely honest, it looked more like an experiment in rust preservation than it did a hand tool. Following one of Mr Sellers' tutorials I soon had it sparkling, straight and sharp. I now owned a plane.
Next came a brace and a marking gauge from another car boot sale. The brace needed some de-rusting and a small repair to make it function properly while the marking gauge surely showed its age but worked as required. Next came some garage-sale auger bits that also needed de-rusting and sharpening - a few more Youtube "gurus" sorted those problems out. I already had some cheap chisels I bought years ago from a discount hardware chain. I'd hardly ever used them and never knew how to sharpen them - another problem Mr Sellers solved for me on Youtube. I also had a couple of cheap squares - one of which was a garage sale acquisition in need of some serious love and attention.
I also already owned a couple of hand saws plus a cheap hatchet I bought when we used to go camping in what now seems like a past life.
In addition to all this, I live on a block littered with trees, and equally littered with fallen trees and branches, plus the long straight trunks of young trees I had to fell with a chainsaw because they insisted on growing where they shouldn't have.
Since moving here over 13 years ago, I have felt some of this timber should be put to good use rather than just feeding the worms or the fireplace. One of the trees, a eucalypt of some sort, produces a beautifully rich, rosy-coloured and very dense timber and I have always felt the urge to make something from it.

I don't know what species of eucalypt this is, but it has a wonderfully rich-coloured grain. You can see where I took a lump of wood from the end of a branch that fell following a storm a couple of years ago.
With all my new-found "knowledge" and my new old tools, I settled on my first woodworking project.
I grabbed my chainsaw and lopped a lump of wood off the end of a fallen branch of the rosy-timbered tree. I clamped it to a small bench and used the chainsaw to remove most of the split wood that occurs as end grain dries, and then continued with the chainsaw to reduce the round log to a rough block shape.
Further reduction was done using the hatchet I'd sharpened for the job. Then I took the plane and flattened one side of the block. All measurements would be referenced from this side.
With some more hatchet work, a bit of hand sawing, a lot more planing, some boring and chiselling and a lot more planing - and a bit more planing after that - I soon had a lump of wood that looked remarkably like a mallet head.
While all this shaping was taking place, I'd also grabbed a paler piece of wood from a different species of gum tree and I used the hatchet to pare it down to something that could make a handle. More sawing, planing, chiselling and still more planing "soon" had this lump of timber fitting neatly in the mortise hole in the mallet head.

My handmade mallet. (Photo courtesy of my son)
The mallet needs to be left to "acclimatise" now for a few weeks, after which I'll take a shaving or two off the handle so it sits deeper in the head.

My mallet posing with some of the tools used to make it.
In the photo above, you can see most of the tools I used and some off-cuts from the timber used to make both parts.
The mallet is hardly perfect. There are splits in the head because the wood was taken from the end of an already-splitting log, but I feel these splits give it some character and I just hope they go no further. I don't know if I'll ever dare to use it to hit anything - not because I don't trust it but because I don't want to mar the surface I took so long to create. I may just keep it as a memento, a sort of "museum piece". Regardless, it has already served its initial purpose which was to provide a vehicle to test some tools and learn some woodworking skills. I might make another one, a bit quicker and a bit rougher and from a wood I'm less in love with, and that mallet can be used to hit things.
Here's a close-up of the grain in the head of the mallet. This is treated with nothing more than boiled linseed oil. Otherwise it's just natural timber with no stains, dyes or varnishes.

I love it!
If you can identify this species from either the grain or the photo above of the tree, then please leave a comment. If it helps, I would describe the wood as very hard, possibly as dense as jarrah and possibly harder (it's not jarrah). The bark of the tree is pale grey, thick and somewhere between papery and corky and readily peels off fallen branches.
I'll sign off with a photo of a few vintage moulding planes I picked up last week from an online auction. I'll soon have these cleaned up and working too.

Wednesday, April 19, 2017
Tangled Web: studio oil painting
Here's number two in my "year of the tree" series.
This group of white gums sits on a farm a few kilometres from home.
While I was initially taken in by the view to the Stirling Range, I was also interested in the patterns created by the twisting trunks and tangled branches and the umbrella-shaped leaf canopies that are typical of many large eucalypts.
As with my last painting, I wanted to capture the strong feeling of sunlight, not only as it played directly across the trunk, branches and leaves of the central tree, but also as it reflected onto the shaded side of the trunk and the undersides of the branches. In fact the shaded branches in the upper canopy have a younger, reddish bark that positively glows with the warmth and strength of that reflected light.
Although they run cattle on this property, I wanted something understated to help balance the image so I added three sheep to the left side. The fence post is also the result of some artistic licence.

This group of white gums sits on a farm a few kilometres from home.
While I was initially taken in by the view to the Stirling Range, I was also interested in the patterns created by the twisting trunks and tangled branches and the umbrella-shaped leaf canopies that are typical of many large eucalypts.
As with my last painting, I wanted to capture the strong feeling of sunlight, not only as it played directly across the trunk, branches and leaves of the central tree, but also as it reflected onto the shaded side of the trunk and the undersides of the branches. In fact the shaded branches in the upper canopy have a younger, reddish bark that positively glows with the warmth and strength of that reflected light.
Although they run cattle on this property, I wanted something understated to help balance the image so I added three sheep to the left side. The fence post is also the result of some artistic licence.

Tangled Web
60x40cm oil on board.
© Andy Dolphin
As before, that shadow colour on the main trunk looked like mud until the bright highlight was placed alongside it. It's quite unnerving to have it sitting there looking "wrong" but I'm sure I'll learn to trust it after painting a few more of these trees.
The trick with something like that is to trust the tone. You need to get that right or it will never work.
Start with what you consider to be the true "local" colour of the bark – a pale ochre in this case – then darken and cool it to the correct tone. Then you will need to add some reflected light into the mix for some parts of the tree. That reflected-light colour is dictated by the area surrounding the tree.
It can seem like a bit of a battle mixing a colour that is both warm and cool, but this approach should get you in the ballpark. Add variety to the bark with some slightly warmer and slightly cooler colours, and it will start to take form.
The trick with something like that is to trust the tone. You need to get that right or it will never work.
Start with what you consider to be the true "local" colour of the bark – a pale ochre in this case – then darken and cool it to the correct tone. Then you will need to add some reflected light into the mix for some parts of the tree. That reflected-light colour is dictated by the area surrounding the tree.
It can seem like a bit of a battle mixing a colour that is both warm and cool, but this approach should get you in the ballpark. Add variety to the bark with some slightly warmer and slightly cooler colours, and it will start to take form.
Saturday, March 25, 2017
Organised Chaos: studio oil painting
I think I've decided to make 2017 the year of the tree, at least as far as painting goes.
Some of my earliest subjects, when I began pursuing fine art, were the karri trees of the southwest. These are among the tallest trees in the world and I produced quite a few paintings where karris were the star.
But in recent years I haven't really used trees as a focal point. Sure, they've been there in the landscape but, since the karri paintings, I have rarely studied trees as a subject in their right.
First cab off the rank for my "year of the tree" is a studio painting of a group of whitegums, or wandoo, which I found on a farm not far from home.
Whitegums are endemic to Western Australia and have a beautiful creamy, honey-coloured and mottled-grey bark that positively glows in light or shade. Older whitegums, especially those in exposed positions, have a tendency to lose limbs over the years and to twist and turn as the elements take their toll.
With branches snaking in all directions as they compete for light, and sometimes falling to the floor or getting hung up in other branches, the trees take on a kind of organised chaos in their constant struggle to survive.
In this painting, I attempt to capture some of that chaos by looking at the base of a group of whitegum trunks. I don't know if this is one tree that divided early in its life, or if three separate trees have survived for years huddled together. I suspect the former.
 At 60cm x 40cm, this painting is somewhat bigger than the paintings I was doing leading up to my recent hiatus. The larger surface gave me the opportunity to explore the seemingly random pattern of branches in the tree canopy.
One important achievement in this piece was to get a sense of the reflected light illuminating the shaded sides of the trunks. Those are interesting colours to mix because they look like dark mud on the palette and yet have a warm glow about them when placed in context in the painting. The "mud" really came to life when the bright highlights were added to edge of the tree trunks.
Some of my earliest subjects, when I began pursuing fine art, were the karri trees of the southwest. These are among the tallest trees in the world and I produced quite a few paintings where karris were the star.
But in recent years I haven't really used trees as a focal point. Sure, they've been there in the landscape but, since the karri paintings, I have rarely studied trees as a subject in their right.
First cab off the rank for my "year of the tree" is a studio painting of a group of whitegums, or wandoo, which I found on a farm not far from home.
Whitegums are endemic to Western Australia and have a beautiful creamy, honey-coloured and mottled-grey bark that positively glows in light or shade. Older whitegums, especially those in exposed positions, have a tendency to lose limbs over the years and to twist and turn as the elements take their toll.
With branches snaking in all directions as they compete for light, and sometimes falling to the floor or getting hung up in other branches, the trees take on a kind of organised chaos in their constant struggle to survive.
In this painting, I attempt to capture some of that chaos by looking at the base of a group of whitegum trunks. I don't know if this is one tree that divided early in its life, or if three separate trees have survived for years huddled together. I suspect the former.

Organised Chaos
60x40cm oil on board.
© Andy Dolphin
One important achievement in this piece was to get a sense of the reflected light illuminating the shaded sides of the trunks. Those are interesting colours to mix because they look like dark mud on the palette and yet have a warm glow about them when placed in context in the painting. The "mud" really came to life when the bright highlights were added to edge of the tree trunks.
Monday, March 13, 2017
Eastern Stirlings: studio oil painting
Last year my son Michael and I climbed a number of local mountains. One of those climbs was the walk to the top of Bluff Knoll, the highest point in the southern half of Western Australia.
To the east of Bluff Knoll lies a mountainous wilderness known colloquially as "the ridge walk". Requiring serious bush-walking, navigation and climbing skills it is, by all accounts, a magnificently hellish place to experience.
It's on our list.
It's not near the top of the list, however.
For now, I have to console myself with photos of the region, taken from the ground or from Bluff Knoll.
This painting, showing the view to Ellen Peak at the eastern end of the ridge, is based on mid-afternoon photos I took from the top of Bluff Knoll last September.

I hope to take another look at this same scene once the cooler weather settles in later this year. Early morning or late evening should be spectacular.
To the east of Bluff Knoll lies a mountainous wilderness known colloquially as "the ridge walk". Requiring serious bush-walking, navigation and climbing skills it is, by all accounts, a magnificently hellish place to experience.
It's on our list.
It's not near the top of the list, however.
For now, I have to console myself with photos of the region, taken from the ground or from Bluff Knoll.
This painting, showing the view to Ellen Peak at the eastern end of the ridge, is based on mid-afternoon photos I took from the top of Bluff Knoll last September.

Eastern Stirlings
34x20cm oil on board.
© Andy Dolphin
I hope to take another look at this same scene once the cooler weather settles in later this year. Early morning or late evening should be spectacular.
Friday, March 10, 2017
Peaches and cream with John Wilson
John Wilson is an artist with a worldwide reputation. Based in the Blue Mountains, a couple of hours drive from Sydney, John has built a career on capturing the region in oil paint and last month I was lucky enough to find a spot in one of his 10-day masterclass workshops.
It was an amazing experience as John gave students his recipe for "peaches and cream" and "apricot" and explained his use of foundational warm and cool greys. No questions went unanswered as John shared the knowledge borne from of his years of professional experience.
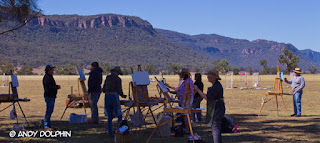
Of the 10 days, three involved painting en plein air in some of the most beautiful places on earth. We painted from the Megalong Valley to the Capertee Valley and it was easy to see why so many artists are drawn to the region.
I ventured out on my own, before and after class every day and on the weekend in the middle of the course, snapping hundreds of photos. I also managed to do a few of my own paintings on the edge of the Katoomba cliffs.
One of my more-successful attempts was painted one morning from a cliff face not far from the Sky Rider motel where I stayed.

One thing you quickly learn here is to pay attention at the start and to cement the image in your mind because the light can change dramatically even in the short time it takes to do a small painting like this one.
And here is the "proof I really was there" photo.
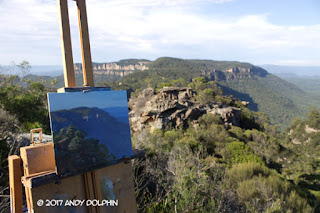
As you can see in this photo, the dramatic shadow cast by the distant mountains in my painting was almost completely gone by the time I put down my brushes, less than one hour after I began.
One evening I went to a small lookout just before sunset and decided to challenge myself to see just how fast I could paint something.
I set about capturing the Three Sisters, arguably Katoomba's single-biggest natural attraction, as the light shifted rapidly with massive thunderhead clouds building all around and changing from bright fluffy white to rich, deep shades of orange and purple.
The final painting took about 30 minutes, after which there was no sunlight on the cliffs and it was too dark to tell what colours I was mixing.

As a painting, it leaves a little to be desired but as an exercise, I absolutely love it.
Thanks John and Cecelia, and everyone who attended the workshop, for an inspirational two weeks with some great people. I hope to do it again soon.
It was an amazing experience as John gave students his recipe for "peaches and cream" and "apricot" and explained his use of foundational warm and cool greys. No questions went unanswered as John shared the knowledge borne from of his years of professional experience.

Of the 10 days, three involved painting en plein air in some of the most beautiful places on earth. We painted from the Megalong Valley to the Capertee Valley and it was easy to see why so many artists are drawn to the region.
I ventured out on my own, before and after class every day and on the weekend in the middle of the course, snapping hundreds of photos. I also managed to do a few of my own paintings on the edge of the Katoomba cliffs.
One of my more-successful attempts was painted one morning from a cliff face not far from the Sky Rider motel where I stayed.

Near Devils Hole (plein air)
25x20cm oil on canvas board.
© Andy Dolphin
One thing you quickly learn here is to pay attention at the start and to cement the image in your mind because the light can change dramatically even in the short time it takes to do a small painting like this one.
And here is the "proof I really was there" photo.

As you can see in this photo, the dramatic shadow cast by the distant mountains in my painting was almost completely gone by the time I put down my brushes, less than one hour after I began.
One evening I went to a small lookout just before sunset and decided to challenge myself to see just how fast I could paint something.
I set about capturing the Three Sisters, arguably Katoomba's single-biggest natural attraction, as the light shifted rapidly with massive thunderhead clouds building all around and changing from bright fluffy white to rich, deep shades of orange and purple.
The final painting took about 30 minutes, after which there was no sunlight on the cliffs and it was too dark to tell what colours I was mixing.

Three Sisters (plein air)
20x25cm oil on canvas board.
© Andy Dolphin
As a painting, it leaves a little to be desired but as an exercise, I absolutely love it.
Thanks John and Cecelia, and everyone who attended the workshop, for an inspirational two weeks with some great people. I hope to do it again soon.
Subscribe to:
Posts (Atom)